The Ultimate Guide To WordPress Speed Optimization
People don’t have time – not in the world we live in. So, it is of vital importance that your website loads as fast as possible, otherwise, you will potentially lose a lot of visitors which would have otherwise interacted with your site. The window of loading time that most people give a website is 0 – 2 seconds. Anything above that and you will be bleeding visitors prematurely. So basically, the more time your website takes to load, the more percentage of the people who are waiting will put an end to said wait and move on with their lives.
And that’s exactly the problem we will solve today. This tutorial will be solely focused on WordPress speed optimization to the complete maximum. I’m an absolute freak when it comes to optimizing and perfecting things, so you can be 100% sure that anything that could be done in order to make a peregrine falcon out of your WordPress site will be included here. Let’s get it on already.
What You’ll Learn
- Why site speed is so important – now, I’m sure that you already know and feel this in your bones, but we can’t go without mentioning it. We will also take a look at a bunch of site speed statistics that will prove this point.
- The ultimate guide to WordPress speed optimization – you will learn exactly what you need to do in order to drastically lower the loading times of your WordPress site.
- Summary – a quick wrap up of this speedy post.
Why Is Site Speed So Damn Important?
The short answer to that question is “money” – a faster site will make you more money. The long answer includes a bunch of statistics that simply prove that point. However, they are something that every website owner should be aware of. Now, there are already a dozen posts around the Internet which include said statistics (like this one, that one, and this one), so I will simply list the ones that I consider to be of critical importance:
- 83 percent of users expect sites to load in less than 3 seconds.
- The average load time of the top 500 e-commerce websites’ home pages is 10 seconds.
- 79 percent of shoppers who are dissatisfied with website performance are less likely to buy from the same site again.
- A slow site was found to negatively affect user experience, bounce rate, SEO, and conversions.
- A 1 second improvement in load time equals, on average, 7 percent increase in conversions. For example, if your site makes $1,000 per day, you will be losing roughly $25,550 per year because of that 1 second slower load time.
- A 1 second delay in page load time decreases customer satisfaction by about 16 percent.
- Amazon and Walmart both reported 1 percent loss in revenue for each 100 ms of site speed delay.
- Obama’s fundraising campaign increased donation conversions by 14 percent when they brought down page load times from 5 seconds to 2 seconds. This resulted in an additional $34 million in contributions.
- Mozilla boosted their conversion rates by 15.4 percent when they removed 2.2 seconds from their page load times. This resulted in more than 60 million additional downloads per year.
- More than 40 percent of people will abandon the page before it even loads, if they have been waiting for more than 3 seconds.
- 73 percent of mobile Internet users said that they have encountered a website that was too slow to load.
- Most mobile web users will wait no more than 10 seconds for a page to load before they abandon it.
- 44 percent of online shoppers will tell their friends about a website that they’ve had bad experience with.
- Online shoppers remember online wait times to be 35 percent longer than they actually are.
- 51 percent of online shoppers in the U.S. say that a slow website is the top reason why they abandon a purchase.
- 18 percent of online shoppers will abandon their cart if page load times are too slow.
- 64 percent of mobile web users expect a page to load in less than 4 seconds.
- If a page takes more than 8 seconds to load, visitors who actually wait that long will spend only 1 percent of their time looking at primary banner content.
- At peak traffic times, more than 75 percent of online surfers will abandon a site for a competitor’s rather than wait for it to load.
- According to this study, tolerable page load time is about 2 seconds. However, adding a progress bar, a loading icon, etc, can increase tolerable waiting time significantly, all the way up to 38 seconds.
Of course, there are countless more statistics just like the ones from above that basically prove the same thing – site speed is money. If you increase your site speed, your visitors will have a better user experience, they will engage more with your website, they will convert better, and ultimately, they will be more profitable to your business – simple as that.
The Ultimate Guide To WordPress Speed Optimization
Now, when you first install the WordPress CMS on your server, it is far from what I’d call “speed optimized”. So, it is your job to make it lightning fast. Along with this guide, I will basically include the exact steps that I took in order to improve the site speed performance of this website – and boy was there a lot of room for improvement. Also, a great “side effect” of improving the page load times of a WordPress site is the huge reduction in bandwidth from the origin server and trust me, you are going to need that. Okay, let’s optimize.
Initial Tests Of Your Page Load Times
The first thing you need to do is test your current site speed to see where it stands at the moment. Now, there are a bunch of tools that you can use for that purpose, but I only recommend using these two:
Basically, what you will be looking for at this point is page load times only. Forget about the other things for now. Depending on the hosting you are using, the WordPress theme you have chosen, the plugins you have active on your site, the location from where you are testing your site speed, and a bunch of other factors, you will get different results, but they will be similar enough to point you in the right direction – site speed optimization.
After seeing all of the above statistics about website speed and understanding how important it is, and after seeing how slow your website is, you cannot help but go into optimization mode – just as I did. Now, I’ve probably read all of the top ranking articles about WordPress speed optimization at that time and they pointed me in the right direction, but one thing annoyed me – each and every one of them did not cover the whole picture.
They had great tips, but it was bare and quick and I had to read a bunch of articles to know everything I needed to do – and I’ve probably missed something. That is one of the main reasons why I’m writing this tutorial – because I want a real ultimate WordPress speed optimization guide, all at one place.
Anyway, at this point, you have tested your website and you know that you must make it faster – you just don’t know how to go about doing that. Not for long though. Each of the next sections will represent an important part of the WordPress website speed optimization puzzle and you need to put them all together if you ever hope to reach those millisecond load times.
Just as a preview, let me show you what happens when I disable just a few of the speed optimization features that I have implemented on this website:
And then what happens when I enable them:
An improvement of more than 2 seconds. And again, I want to note on the fact that I have not disabled all of the speed optimization tricks that I have implemented. For example, the hosting is the same and it is extremely speed influential. All I disabled to receive this 2 second drop in site speed was the caching plugin, the image lazy load plugin and the minification plugin.
That’s it – just these three. That’s nothing considering the fact that I will share with you a total of 15 WordPress site speed optimization tricks. If I had (could have) disabled all of them, this website’s page load time would have certainly crossed the 5 second mark.
Now, let me show you what you need to do in order to optimize your WordPress website to the absolute maximum.
The Fastest WordPress Hosting
Let’s start at the source. The hosting that choose for your WordPress site is one of the biggest factors that will influence its speed. You can’t expect to pay $4.99 per month to HostGator and have your website load in under a second – unless of course it is a very, very simple website. Those affordable web hosts do not allocate that much resources to the server you get for that kind of money and it’s understandable.
Now, I have a hosting account on HostGator and to be honest, I’ve never had any problems with downtime, slow site speeds, etc. Everything has been normal for me over the years – I guess I’ve been lucky with the server as I’ve read countless testimonials from people complaining about HostGator’s server speeds. However, the websites I host with them are just plain simple ones that don’t really have much on them in terms if media – pictures, videos, etc, they mostly have text which doesn’t require a lot of resources to load fast, but the speeds haven’t been and still aren’t something to show off with.
When I was about to launch this website, I knew that it would need a much better hosting than the one I had. So I looked around the Internet and stumbled upon WP Engine and then upon Matt’s rant on them – who hasn’t right? And when I looked at the replies he received, I was just speechless. Being a person who doesn’t really enjoy unprofessionalsim, I knew I wouldn’t go with WP Engine.
Now, I’ve never ever tested their hosting services and they could (might) have fixed everything and fired everyone who knew nothing of WordPress, yet was assigned as technical support, but I didn’t want to take that chance. And the part where they change code from the core of your WordPress installation really cut the deal for me. I know an honest person when I see one and Matthew seems like one – so I went with his recommendation – WPX Hosting (our honest WPX Hosting review).
Why am I telling you all this? Well, it’s not that I am promoting WPX Hosting (which I am and they deserve it), but it’s because I wanted you to know my personal experience with hosting providers, however small it is, and how I reached to the decision of going with TPH, because it has helped me a lot in terms of site speed and in terms of cutting some monthly costs.
So, I sent WPX Hosting a support ticket and they responded within an hour (great impression was made), and migrated my site from HostGator to their servers within a few hours – no charge whatsoever. The speed of the website jumped instantly after the nameservers were updated and I really liked it.
So, bottom line, the first and most important factor for your WordPress site’s load times is the hosting. From my own personal experience, I strongly recommend WPX Hosting not just because the hosting itself is amazing and extremely fast, but also because I’ve opened a number of support tickets over the months and have gotten replies within an hour by people who really know and understand the WordPress platform.
WordPress Theme
Right after the hosting of your website we have the WordPress theme that you will choose. For instance, I chose Enfold for this website, which is not the fastest if you ask me, but provides the functionality and sense of design and simplicity that I like.
This part of the speed optimization process is a bit tricky and doesn’t really have an exact answer, because the WordPress theme you choose must not only be fast, but also, meet your vision for the website that you want to create. If you are interested in knowing which the fastest WordPress themes out there are, check out this case study, this WordPress themes performance rankings post, and also, this more recent case study as well.
Now, as we said, when you are choosing a theme for your WordPress site, its speed should not the defining factor, but rather, the functionality provided by the theme. Of course, the more functionality, the more libraries, code, styles, scripts, etc will be included in it, so the slower it will be overall. How much slower? Well in my case, according to this case study, Enfold loaded in 1.68 seconds while the fastest WordPress theme out there, namely Genesis Framework, loaded in 700 ms – a difference of 968 ms.
That is additional load time I can tolerate since Genesis Framework is very far from the functionality offered by Enfold almost all of which I take advantage of, and also, Enfold still loaded in that critical 0 – 2 seconds window.
Bottom line, when it comes to choosing the theme for your WordPress site, you should first look at a bunch of themes that will be appropriate for the vision you have in your mind, then analyze each of them to find the one that will best fit your requirements, while also looking at page speed times, but not as a deal breaker.
Caching Plugin & CDN
Aside from the hosting provider you choose for your WordPress site, a caching plugin and a CDN will most significantly lower page load times. The caching plugin will serve static pages whenever possible and the CDN will make sure that your website loads faster from more locations around the world as well as save you a ton of bandwidth.
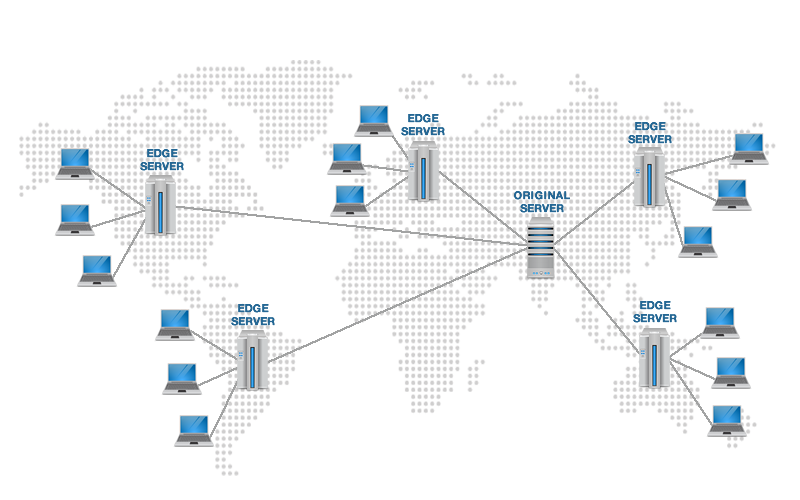
I’m sure that you’ve noticed that when you test your website’s speed via Pingdom, and you select the server in Australia or Amsterdam to perform the test, the loading times jump up instantly. Of course, if your hosting is in these 2 countries it will be vice versa, but you get the point. So, in order to cope with this problem, a CDN can store the files from your server which take more time to load such as images, videos, CSS, JavaScript, etc, and will later serve them to the visitor from the closest Edge server possible in order to drastically reduce load times:
So, each laptop from the image above represents a person trying to access your website and each Edge server represents a server from your CDN where the aforementioned files are stored. I think the rest is self-explanatory. Instead of making a request directly to the original server (where your website is hosted), people will get content served from the closest Edge server. And that’s basically what a CDN does. Now let me show you what worked best for me and exactly how you will set up a caching plugin and a CDN.
Setting Up The CDN
In the beginning, I set up only MaxCDN as a CDN, and it seemed to work okay. Site was fast, but not as fast as I wanted it to be. I was striving for that “under 2 seconds window” and the site was usually loading in around 3 seconds. The homepage was the only one that was reaching load times of under 2 seconds. So I continued my search for maximum WordPress speed optimization and stumbled upon a blog comment (I think), talking about using both MaxCDN and CloudFlare.
At first it was hard for me to understand why I would need two CDNs, but I caught on with the concept quickly. Basically, the combination of W3 Total Cache as a caching plugin for WordPress and MaxCDN + CloudFlare produced the best results for me. After I implemented these three together, everything became lightning fast. At first I was a bit afraid to combine all of these software and services as I thought something would fuck up, but everything went well in the end. Let me show you exactly how this site’s cache and CDN is set up.
Setting Up MaxCDN
As a start, I bought the smallest plan which is 100 GB bandwidth per month. That has been enough so far and a great thing about MaxCDN is that if you don’t use all of those 100 GB in a particular month, the remainder gets added to the next month and so on. So, none of the bandwidth that you purchase is ever lost. I actually didn’t know that when I purchased my package with MaxCDN, so I thought I’d mention it here.
Now, once you login to your MaxCDN account, the first thing you need to do is create a pull zone. MaxCDN has 3 main types of zones:
- Pull zone – perfect for storing CSS, JavaScript, images, and pretty much any type of file that is accessed on a daily basis.
- Push zone – perfect for PDF files, e-books, and any other larger files that never or rarely change.
- VOD zone built for video streaming.
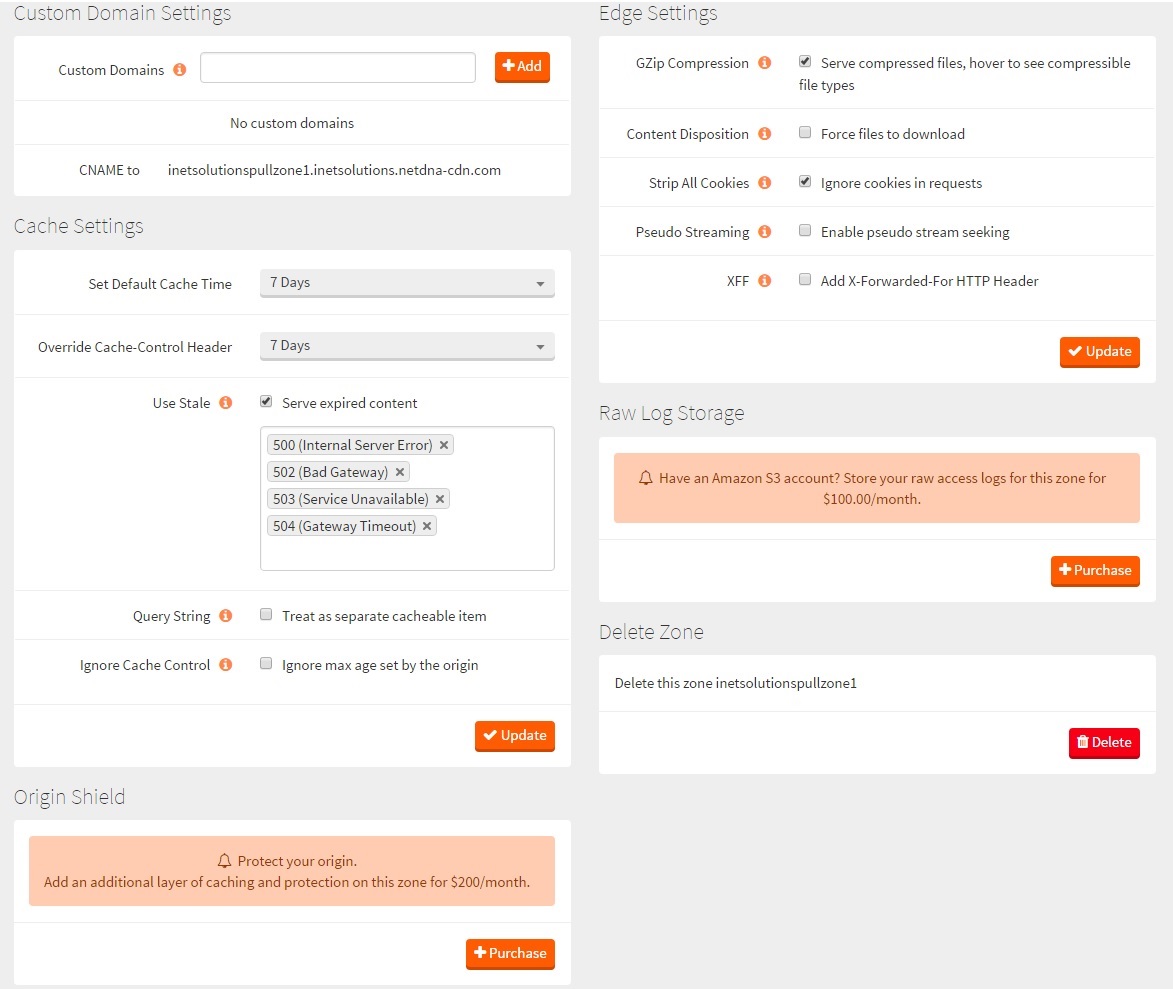
So, create a pull zone on your MaxCDN – make sure to name it accordingly. For instance, the pull zone of this site is called “inetsolutionspullzone1”. Why the 1 at the end? Well, because in the future, when the website starts receiving more and more traffic, I will be adding another pull zone to further increase site speed. Once you create the pull zone, you will be looking at something like this:
The default settings differ from the ones above, but through research and testing, I have found these to be the best ones. I won’t go into explaining what each of them represents since when you hover over the small “i” symbol, you will get an explanation. One thing I want to talk about here is “Custom Domains” at the top left corner.
When I first created the pull zone, I added a total of 4 custom domains:
- 0.cdn.inetsolutions.org
- 1.cdn.inetsolutions.org
- 2.cdn.inetsolutions.org
- 3.cdn.inetsolutions.org
The idea was to use one for JavaScript files, another for CSS files, another one for images, etc – which is a functionality offered by W3 Total Cache. However, when I switched back to the default address which is “inetsolutionspullzone1.inetsolutions.netdna-cdn.com” as you can see, the website started performing even better and faster. That is what I have observed, so I am sharing it with you.
However if you still would like to add custom domains to your pull zone, here’s what you need to do. You either need to contact your hosting to add CNAME records to your DNS which point to the “CNAME to” variable from MaxCDN, or you need to do it yourself if you have access. So for example, when I created the “0.cdn.inetsolutions.org” custom domain, the guys from WPX Hosting added a DNS record that pointed “0.cdn.inetsolutions.org” to “inetsolutionspullzone1.inetsolutions.netdna-cdn.com”.
And that’s basically it. Keep in mind that you can add no more than 4 custom domains to a pull zone. If you are feeling a bit confused with all this custom domains talk, don’t worry. Everything will clear up in a minute once we connect MaxCDN with W3 Total Cache. But before we get to that, let’s first set up CloudFlare as well.
Setting Up CloudFlare
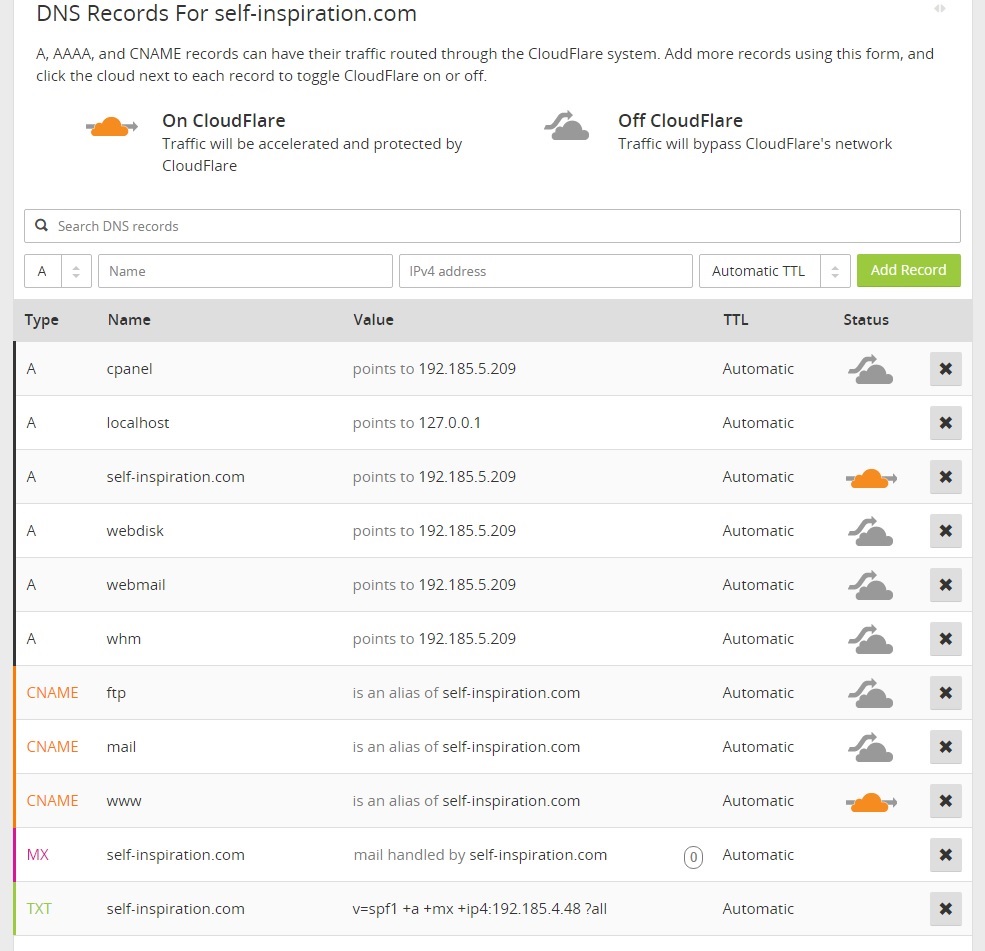
Setting up CloudFlare is a bit trickier than MaxCDN. Basically you create a CloudFlare account (it is 100% free), you login, and you click on the “Add site” link. Then you enter your domain and wait for CloudFlare to scan its DNS records. Once it’s done, hit click “Continue Setup” and you will see something similar to this:
Basically, all DNS records for the domain you enter will be listed in a table. Now, I generally let them stay as they are, but this step is open to customization. For example, if you added custom domain names to your MaxCDN pull zone, this is the place to add those CNAME records we talked about earlier. For example, if I want to add the custom domain “0.cdn.inetsolutions.org” to my website’s DNS records, I would do the following:
And that’s basically it. If you’ve added 4 custom domains to your MaxCDN pull zone, you need to do the exact same thing for each of them. Once you click “Add Record”, you will see the new DNS record appear in the table below. Why does CloudFlare need to scan your website’s DNS records and why do you need to add your custom domain there?
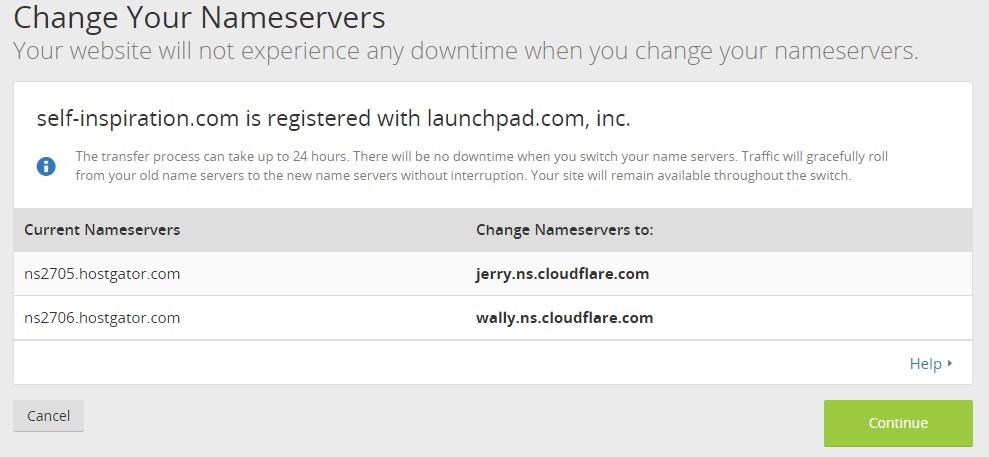
It’s because, in order to use CloudFlare, you need to point your domain to their nameservers. So, your domain won’t point to WPX Hosting‘s nameservers anymore, but rather, to the ones CloudFlare assigns to you at the end of the adding a new site process – like this:
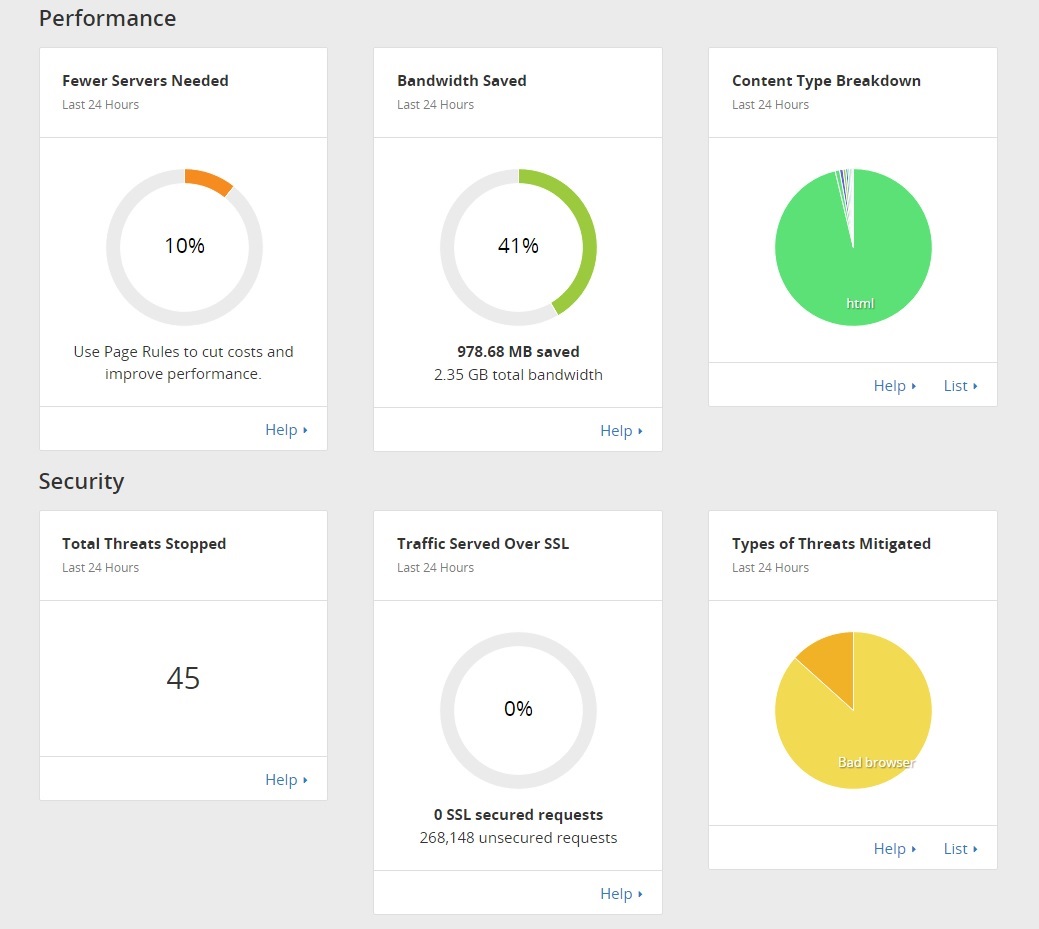
So, in this example, I need to point the domain self-inspiration.com to the nameservers “jerry.ns.cloudflare.com” and “wally.ns.cloudflare.com” in order for that domain to start using CloudFlare. And don’t worry, there won’t be any downtime whatsoever. When the nameservers are updated, you will see in CloudFlare that the site is active and you will be able to look at all kinds of statistics such as number of requests over a certain period of time, bandwidth used, unique visitors (not accurate), and number of threats. You will also see a bunch of pie charts showing various important stats:
One of the more important ones from the statistics above is the “Bandwidth Saved” pie chart. Basically, I added CloudFlare not only to increase the speed of my website, but to also save up on some bandwidth. As the site became more and more popular and started getting more and more traffic, bandwidth increased, and the thing is, WPX Hosting‘s smallest plan has a limit on monthly bandwidth.
In order to cope with that and with the not so satisfy-able speed my website I used to have, I implemented CloudFlare as well. The best part is that it’s 100% free, so no monthly costs there. And as you can see, it’s working out pretty well. Just in the last 24 hours, CloudFlare has saved me close to 1 GB of bandwidth which is about 41 percent of the entire bandwidth for the day. Not too shabby at all.
Now, once your nameservers get updated and your domain starts pointing at CloudFlare’s nameservers, you will see it become active. At this point, you need to login back into your CloudFlare account, and configure the following settings for your website.
From the “Speed” tab, you need to have “Auto Minify” disabled on all the three options – JavaScript, CSS, and HTML. We will be using a WordPress plugin for minification so we won’t need this one. Also, on the same tab, you need to make sure that the “Rocket Loader” feature is “Off”. At first I tried it and it messed up the scripts on my website – it is no coincidence that this feature is still in beta version, so avoid it for now.
From the “Firewall” tab, you need to set the “Security Level” option to “Low” – I have found this one to work the best since anything higher is redundant and could possibly block innocent people from reaching your website.
Then from the “Caching” tab, you need to set the “Caching Level” to “Standard”, and the “Browser Cache Expiration” to 4 hours. And that’s basically all the settings you need to tweak in CloudFlare. At this point, you have prepared the CDN for your website and you are ready to connect it to the caching plugin in WordPress. But which plugin shall you use for that?
Setting Up W3 Total Cache
Yep, that’s right. My WordPress caching plugin of choice is W3 Total Cache. The plugin makes it extremely easy to connect to both MaxCDN and CloudFlare and also allows a lot of customization on the way it caches your website. Let me show you exactly what you need to do in order to set it up right. On a quick side note, if you went with WPX Hosting, they have optimized settings for W3 Total Cache specifically designed for their servers, which you can simply import into your WordPress site and be done with it.
Also, an important thing to remember about W3 Total Cache is the fact that the speed performance improvement it provides for your WordPress site will strongly depend on the hosting provider you have chosen – as will the settings themselves. So, the W3 Total Cache configuration that I’m about to share with you is optimized to work with WPX Hosting‘s servers and might not be optimal for other hosting providers, so just keep that in mind.
Now, if for whatever reason you will be manually configuring the plugin, here’s what you need to do. After you install W3 Total Cache, go to “General Settings” and enable the following cache types:
- Page cache – set it to “Disk: Enhanced”. This one should be discussed with your hosting provider, but basically, if you are using a more basic hosting plan, “Disk: Basic” is the setting for you and probably will be the only one available, if you are using a more advanced hosting plan (like me with WPX Hosting), then “Disk Enhanced” is the option to go with. However, as far as I’ve researched, the absolute best option in terms of speed boost is “Opcode: Alternative PHP Cache (APC)”, but it is only available if you are hosting your WordPress site on a dedicated or virtual server.
- Browser Cache
- CDN – and select MaxCDN from the “CDN Type” option.
The remaining cache types (“Minify”, “Database Cache”, and “Object Cache”) should remain disabled. And finally, from the “Miscellaneous” section, I have enabled “Verify rewrite rules”.
Connecting W3 Total Cache To MaxCDN
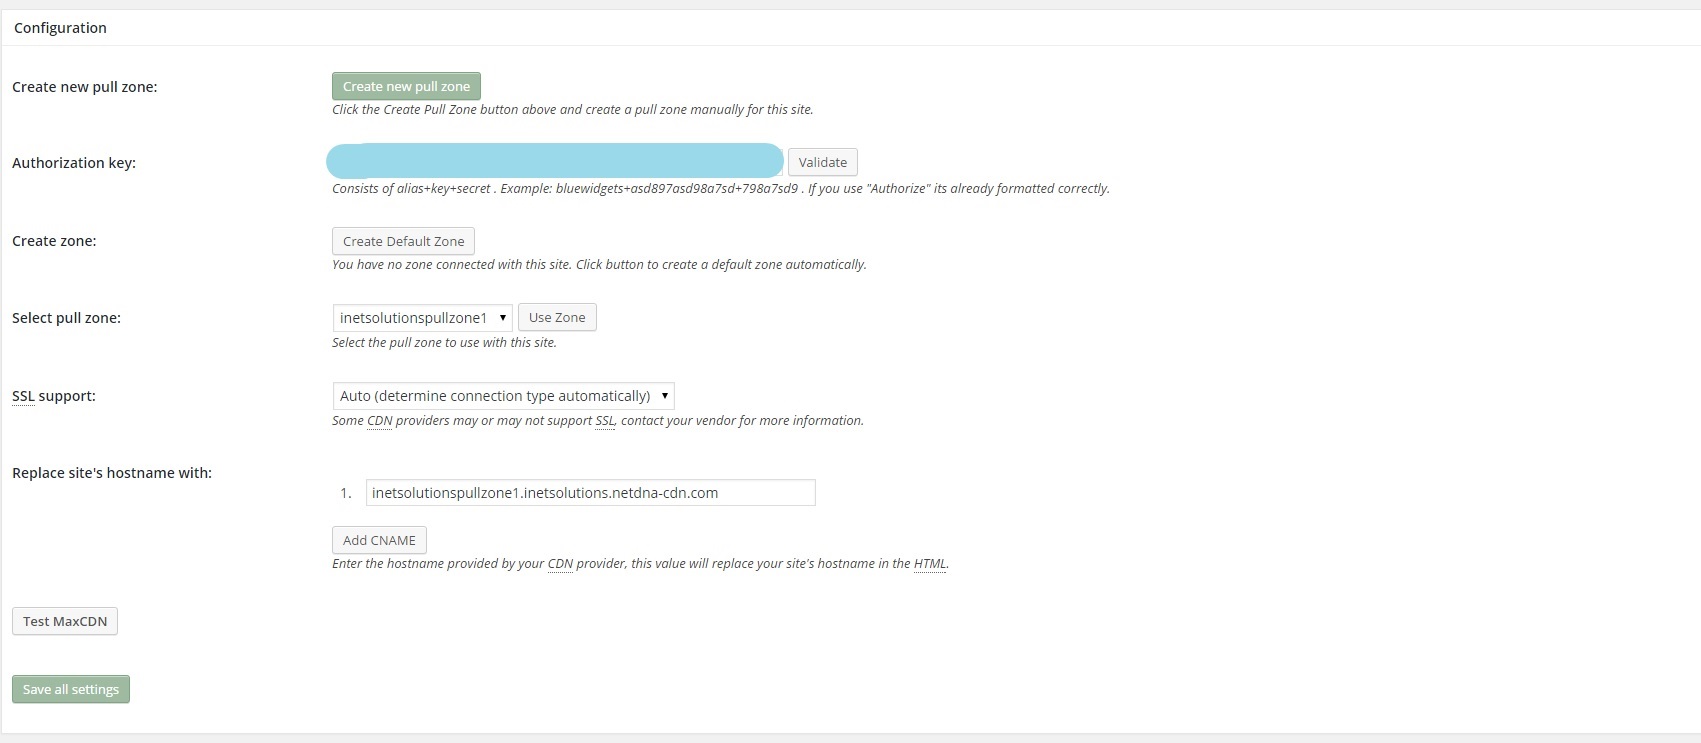
When you are done with the “General Settings” tab of W3 Total Cache, switch to the “CDN” tab – that is where we will configure MaxCDN. Now, I leave everything as it is, and I focus on this section:
Basically, this is where you connect W3 Total cache with your MaxCDN account. Since we’ve already created the pull zone, we won’t be using the first button. As for the authorization key, you can find the necessary data by going to the “Account” tab of your MaxCDN profile and then selecting “API”. You need to basically combine three things:
- Company Alias
- Consumer Key
- Consumer Secret
So, you need to paste “Consumer Alias+Consumer Key+Consumer Secret” (with the “+” signs) in the “Authorization key” field. When you are done with that, click the “Validate” button to make sure everything is okay with the token and move onto selecting your pull zone. Since we already created it, you will be able to directly select it from the dropdown menu once your authorization key is validated.
Leave “SSL support” to its default “Auto” setting and enter your pull zone URL into the “Replace site’s hostname with” field. What this will do is basically replace, everywhere on your website, links to CSS files, JavaScript files, images, etc, with links to the same files from MaxCDN.
Also, this is where you can add your custom domain names if you created such – remember the whole “0.cdn.inetsolutions.org” fiasco? You simply click “Add CNAME” as many times as you need (up to 4), and you fill in the inputs with your custom domain names. Since you should have already added DNS records to CloudFlare when you were adding your website to it, they will work right after we implement CF with W3 Total Cache.
The final thing you want to do is scroll down to the “Advanced” section of the “CDN” menu and then tick the “
When you are done with your MaxCDN domain names, you can simply click the “Test MaxCDN” button to see if everything is working properly. If you get a green “Test passed” message, you are good to go. Now let’s connect W3 Total Cache to CloudFlare as well.
Connecting W3 Total Cache To CloudFlare
Switch to the “Extensions” tab of W3 Total Cache and activate the CloudFlare. Then go back to “General Settings” and scroll down. You should now see a section similar to this one:
Now, a very important note to remember: When I was first setting up CloudFlare with W3 Total Cache, I kept getting errors when I clicked “Save all settings”. I spent probably half a day wondering why won’t it work and couldn’t find anything on the Internet that solved my problem. It turned out that if you have even one setting here different from the ones you have on your CloudFlare account, the plugin will fail to save your settings – which is logical, but the error messages don’t tell you that.
So for example, if you remember, we disabled the “Rocket Loader” option when we were configuring CloudFlare and if we enabled it here and clicked “Save all settings”, it will fail with some stupid error message. So make sure that every single setting here is exactly the same as the configuration of your CloudFlare account – only then click “Save all settings” and enjoy the green success message.
At this point, W3 Total Cache is connected to both CloudFlare and MaxCDN, so the CDN part of the caching speed optimization process is done. Now let’s customize the 2 cache types we enabled in the beginning aside from the CDN – “Page Cache”, and “Browser Cache”.
Configuring Page Cache
Click on the “Page Cache” tab from W3 Total Cache’s main menu. Now, I will simply list the settings that I have activated for the “Page Cache” type, so the ones I don’t list, I don’t have enabled.
- Cache front page.
- Cache feeds: site, categories, tags, comments.
- Don’t cache pages for logged in users.
- Automatically prime the page cache – “Update interval” is set to 900 seconds and “Pages per interval” is set to 10.
- From the “Purge Policy: Page Cache” section:
- Front page.
- Post page.
- Blog feed.
- rss2 (default).
- Purge Limit – 10.
- Compatibility mode is disabled – this gives about 20% boost in performance but can only be disabled because WPX Hosting‘s environment is compatible with W3 Total Cache, otherwise, this option is recommended to be enabled.
- Garbage collection interval – 3,600 seconds.
- Comment cookie lifetime – 1,800 seconds.
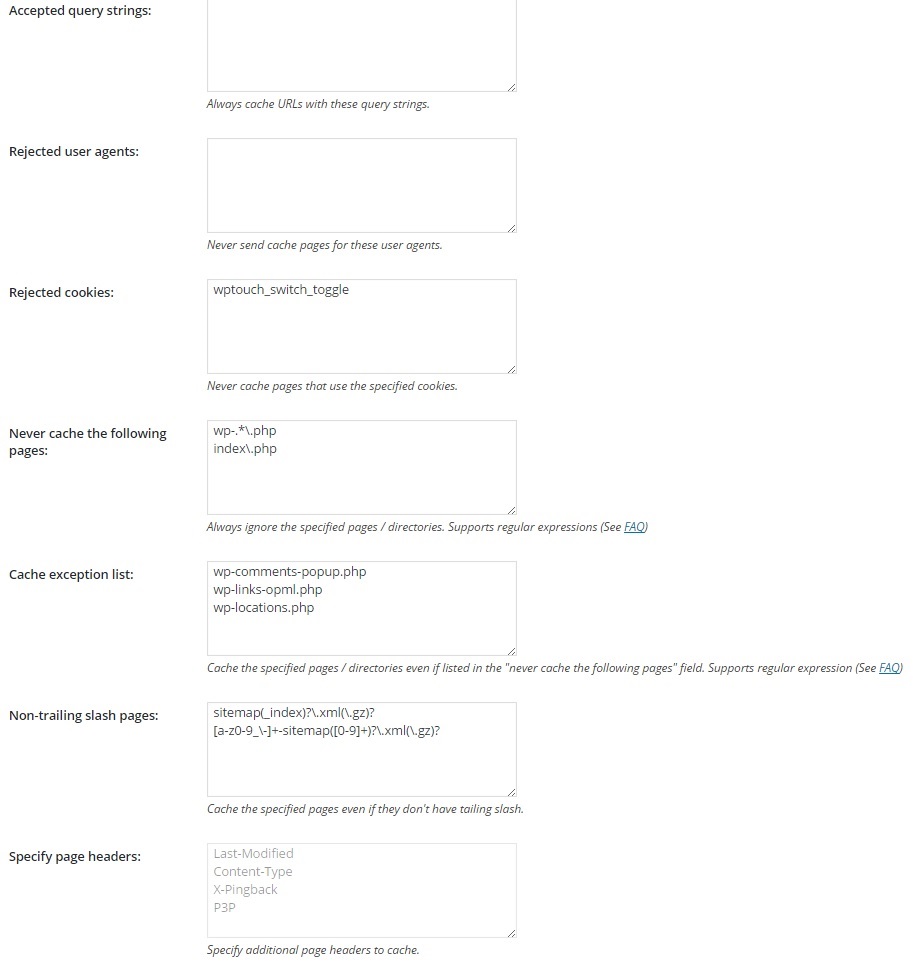
At the end we have a few default settings such as the “Never cache the following pages” input and the “Cache exception list”.
And that’s basically it for the “Page Cache” type. As I already said, WPX Hosting sent me the settings that I needed to import into my W3 Total Cache plugin, but I still modified a few things as far as I can remember. For instance, the minify cache type is active in TPH’s default cache settings, but I removed it to use another, more optimal minification plugin – we’ll get to it in a minute.
Configuring Browser Cache
Just like with “Page Cache”, I will list the settings I have enabled for “Browser Cache”:
- General:
- Set Last-Modified header.
- Set expires header.
- Set cache control header.
- Set entity tag (eTag).
- Set W3 Total Cache header.
- CSS & JS:
- Set Last-Modified header.
- Set expires header.
- Expires header life time – 86,400 seconds (1 day) since I change these quite often.
- Set cache control header.
- Cache Control policy – “cache with max-age (“public, max-age-EXPIRES_SECONDS”)”.
- Set entity tag (Tag).
- Set W3 Total Cache Header.
- HTML & XML:
- Set Last-Modified header.
- Set expires header.
- Expires header life time – 3,600 seconds.
- Set cache control header.
- Cache Control policy – “cache with max-age (“public, max-age-EXPIRES_SECONDS”)”.
- Set entity tag (Tag).
- Set W3 Total Cache Header.
- Enable HTTP (gzip) compression.
- Media & Other Files:
- Set Last-Modified header.
- Set expires header.
- Expires header lifetime – 31536000 seconds (1 year).
- Set cache control header.
- Cache Control policy – “cache with max-age (“public, max-age-EXPIRES_SECONDS”)”.
- Set entity tag (Tag).
- Set W3 Total Cache Header.
- Enable HTTP (gzip) compression.
And that’s it for the “Browser Cache” type and for W3 Total Cache in general. So far, you have created a CDN for your site by combining MaxCDN and CloudFlare and you have connected said CDN with your WordPress site via W3 Total Cache. You also have configured the caching plugin to its optimal values (specific to your hosting environment), but there’s a lot more work to be done in terms of speed optimization – so let’s get to it.
CSS & JavaScript Minification Plugin
As we already said, we won’t be using W3 Total Cache’s minify functionality, because the plugin that I will suggest, namely Better WordPress Minify, is well, better at it. The great thing about it is that this plugin relies on WordPress’s enqueueing system rather than its output buffer, so it will respect the order in which CSS and JavaScript files are loaded as well as their dependencies. It also allows you to customize said order for full compatibility.
Again, just like with W3 Total Cache, I have consulted with my hosting provider to come up with the best settings for Better WordPress Minify. Here’s the configuration of the plugin that’s currently speeding up Inet Solutions, starting with the “General Options” tab of the plugin:
- Minify JS files automatically is enabled.
- Minify CSS files automatically is enabled.
- Leave external files at their original positions is enabled.
- One minify string will contain is set to 10 files at most.
- No cache buster is used since when I update any CSS or JS files, I manually empty the cache and let it rebuild from scratch – I have found that to be a good practice and will also save you some bandwidth.
- Cache age is set to 7 days.
- Enable bubble CSS import is, well, enabled.
- Enable cache file locking is also enabled, but should be disabled if you hosting provider uses NFS filesystem.
Then from the “Advanced Options”, I have activated the “Enable friendly Minify urls” setting and have also connected Better WordPress Minify with MaxCDN:
The last thing you want to do with BWP Minify is to make sure that the files are enqueued properly. Go to the “Enqueued Files” tab and look through the enqueued JavaScript and CSS files. Now, in order to improve the performance of your site a little bit more, you need to move all JavaScript files to be loaded into the footer instead of the header. Remember that annoying “Defer parsing of JavaScript” message from GTmetrix? Well, this is how you remove it, or at least improve on it a lot.
While you are at the “Enqueued Files” tab of the plugin, you need to do the following for each JavaScript file loaded in the header i.e. where it says “minified in header” in its “Position” column. So, click on the “select” link for each file that meets this criteria and then click “move to footer”. The file will then be added to the right where it says “Scripts to move to footer”:
Now, be very careful with the scripts you move to the footer because something might go wrong. In my case with the Enfold theme, I had to leave “jquery.js”, the main “Avia” script file and the scripts of Thrive Leads to load in the header in order for this to work. So you’re going to have to play with this a bit or contact your WordPress theme’s support team for advice. Once you add all files you want to move to the footer, just click the “Save Changes” button and you are good to go. Of course, test your website to see if everything is okay.
My website still has a bunch of scripts that load in the header so it still gets a low score in the “Defer parsing of JavaScript” metric. However, the number of scripts it loads in the header now is much lower and this has noticeably increased site speed. Why haven’t I moved all to the footer? Well, some scripts just have to load in the header otherwise the site breaks or the plugin to which the script belongs stops working properly.
And that puts an end to the minification of your WordPress site’s CSS and JavaScript files. Next stop – image optimization.
Optimizing Website Images and Implementing Lazy Loading
While many parts of a WordPress site take noticeable time to load, images can be the files that most significantly influence the final page load time. If your website’s images are not optimized, the overall site speed will suffer greatly. You can’t expect to upload a 2 MB 1920×1080 image and insert it into your page on a 640×480 spot and then have it load as fast as if you had inserted a 100 KB image with the exact same dimensions as the spot where it is inserted i.e. 640×480. Basically, there’s 3 things you need to do in order to optimize images for your WordPress site – manually prepare and format images before uploading them to your website, use an image smushing plugin, and implement an image lazy loading plugin.
Optimizing Images Before Uploading Them To Your Website
There are quite a few image formats out there, but the most frequent ones you will be using are JPEG and PNG, and perhaps, GIF here and there. Now, if you are unaware of the differences between these 3 image types, you should first take a look at this article – it will give you an idea of what you will be dealing with and what image type you should prefer for different situations.
Generally, you’d want most of your images to be JPEG since they are smaller than both PNG and GIF files and can also be compressed quite a lot, making them ideal for both website speed improvement and bandwidth reduction. Of course, if you have an image with a transparent background, you are going to have to go with a PNG file, but that’s a given. Let me give you an example.
When I write a tutorial, like this one for example, I would usually take screenshots of my desktop, then paste them into Paint and save them. As a test, I just did that and saved the screenshot as both a PNG file and JPEG file. The PNG file turned out to be 3.3 MB while the JPEG file turned out to be 1.2 MB – just to show you the difference in sizes. Now, this 1.2 MB JPEG image is 5206×1080 pixels which is why it is so big.
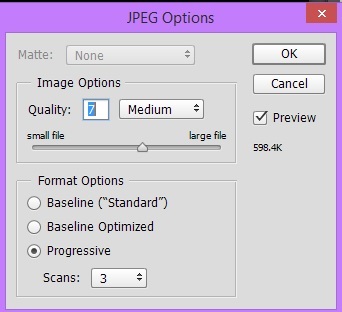
In such cases where I have a huge JPEG image, and I do not want to resize its resolution for whatever reason, I would simply open it with Adobe Photoshop and compress it a bit:
As you can see, that same 1.2 MB 5206×1080 image will now be only 600 KB once Photoshop is done compressing it. A bit of quality will be lost for sure, but not enough to be very noticeable. With this example, I just wanted to show you a way you can prematurely save yourself some page load time and bandwidth.
Now, for instance, Enfold creates a number of variants (thumbnails) of an image when you upload said image into WordPress, so that, when that same image is used somewhere throughout the site (widget, preview, footer, etc), the appropriate thumbnail size will be inserted instead of the full image that was uploaded. This is done in order to optimize your site speed and to not have a 1920×1080 image load in a 640×480 spot, which is just not efficient.
So image resizing is very important before you upload the file to your WordPress site. Make sure that it is the exact same size you need in order to cover the space where the image will reside – do not make it any bigger nor any smaller than that.
In the beginning, I used to completely ignore the sizes and types of images I was inserting into my WordPress posts and I learned the hard way not to do that. I ended up with a bunch of pages that were reaching sizes of up to 10 MB (when they could have been just 1.5 MB) and not only the site’s speed was slow, but the bandwidth was going through the roof as well. So, I later had to manually go through each and every image, download it, optimize it, and then re-upload it again. Save yourself all this trouble and optimize your images before you upload them to your server.
Further Optimizing Your WordPress Images
Once you’ve uploaded your images to your server, you can use yet another optimization trick – an image optimizer plugin. Basically, you can choose between two – WP Smush and EWWW Image Optimizer. These plugins can go through every single image you have uploaded to your WordPress site, and further optimize them for a little bit of extra site speed and bandwidth reduction.
How little bit? Well, when I ran EWWW Image Optimizer, it lowered the size of almost all of the images already uploaded by about 5 – 10 percent each, of course without lowering their quality. And it’s very easy to run actually. First you need to configure a few settings from the “Advanced Settings” tab:
- optipng optimization level – Level 3: 16 trials.
- pngout optimization level – Level 2: Longest Match (Fast).
Then you simply go to the “Bulk Optimize” tool, you configure a few settings, and you click the “Start optimizing” button:
Now, if you are using WPX Hosting, you will see an error message that goes something like “EWWW Image Optimizer requires exec(). Your system administrator has disabled this function.” This is a security feature of TPH and you need to contact their support and ask them to enable the exec() function so you can run the plugin, otherwise it won’t work.
As I told you, I ran it once and, while it did cut the sizes a bit, I don’t use such a plugin anymore since I optimize my images before I upload them to the server – and so should you.
Lazy Loading Your Images
The final step of the WordPress images optimization process is to implement a lazy loading plugin. For those unaware, an image lazy loading plugin will basically put placeholders instead of loading the images as soon as someone opens a page on your website. When the user scrolls down, only then will the images be loaded. This will both increase your WordPress website’s speed and will also significantly reduce bandwidth.
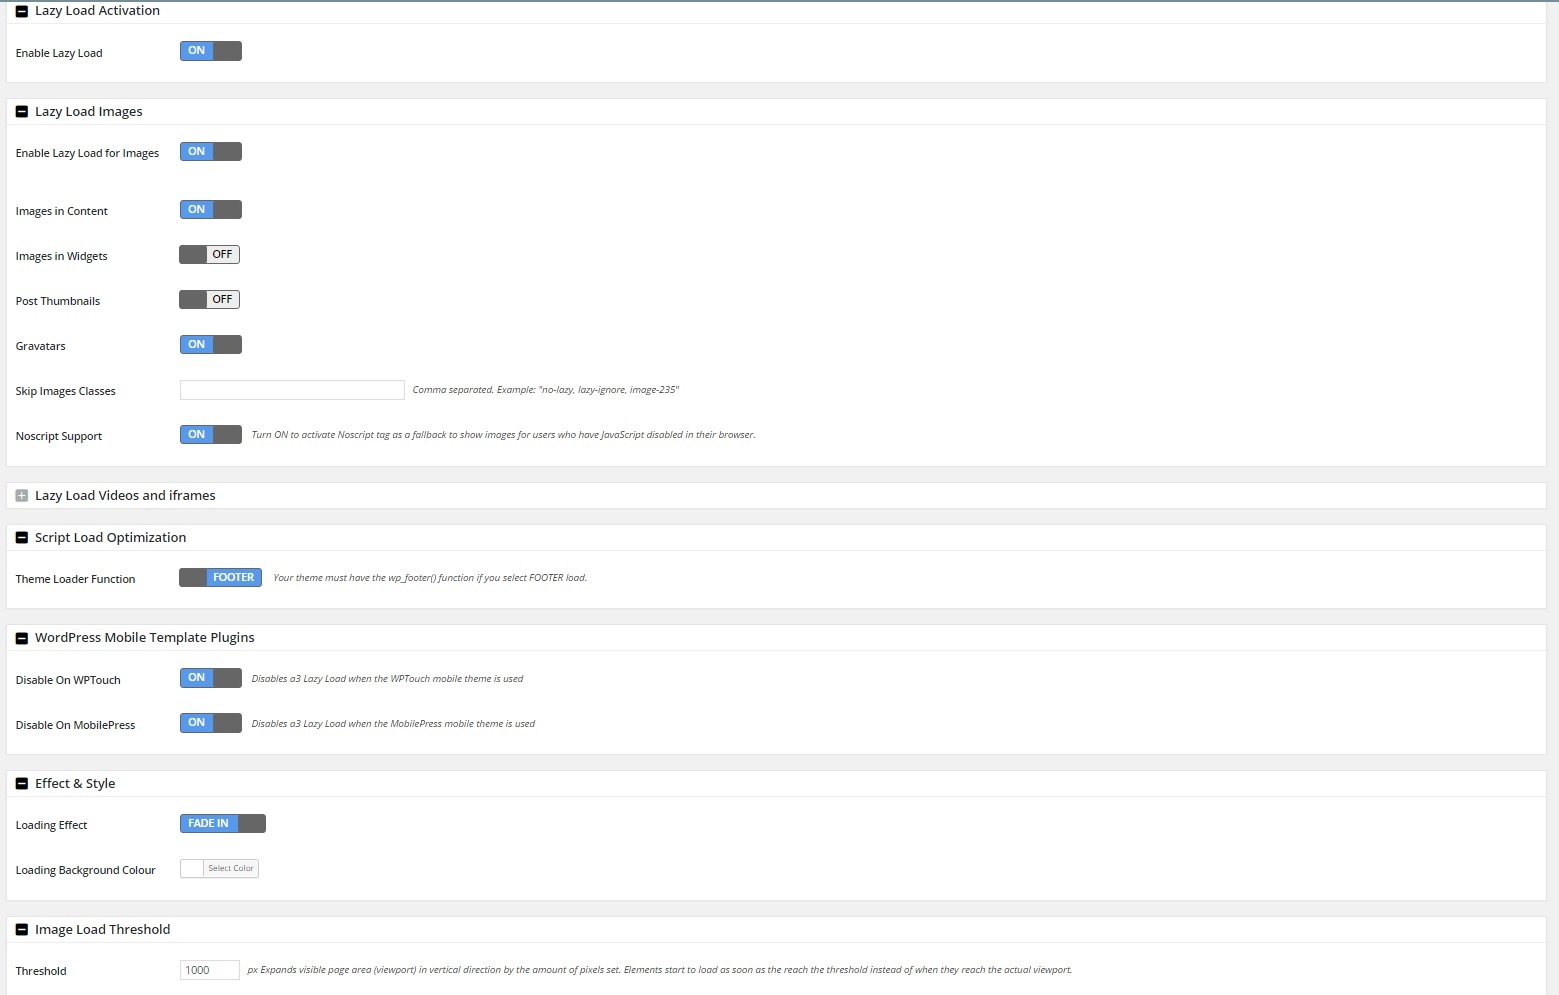
I went with the a3 Lazy Load plugin and it was a great choice. The plugin is extremely simple and works perfectly. I also love the fact that it comes pre-configured out of the box, but you can also customize it if you so wish. Here’s a look at the plugin’s configuration for Inet Solutions:
I think that the settings are self-explanatory. I want to note on the threshold option only: this is basically the number of pixels above the placeholder of the image which the user must scroll beyond in order for the image to be loaded. I’ve set this to 1,000 pixels because I don’t want the image to load when the user reaches it and thus waste time in wating, but rather, I want the images to be loaded before the user reaches them, so as to achieve an effect of transparency.
And with that, we conclude the image optimization of your WordPress site. This part of the performance improvement process strongly influences site speed so do not ignore it like I did at first.
Optimizing Your WordPress Database
I’m sure that you are well aware of the level of spam each WordPress site receives. And if you are using a spam protection plugin such as Akismet or CleanTalk, or both (as this site is), you know just how many spam comments are added to your database on a daily basis.
And it’s not just the comments that can clutter the database. Old post revisions, page revisions, drafts, posts in the trash, pages in the trash, and stuff like that should all be cleaned up on a regular basis. The good news is that there is a plugin that can do exactly that with the click of a button – WP-Optimize.
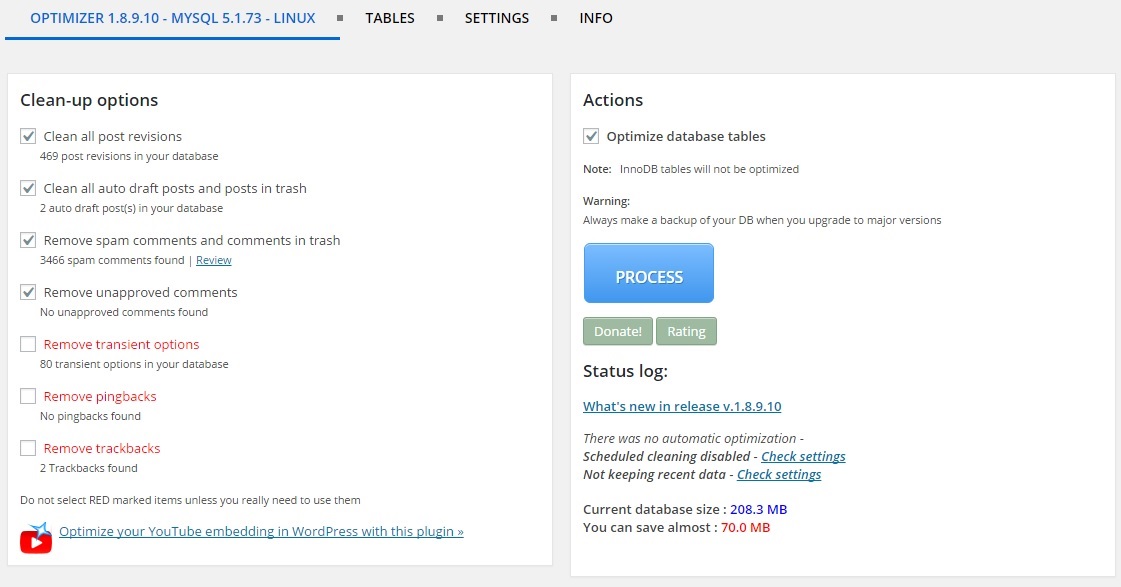
Basically, you install it, you go to its setting and you click the big blue “Process” button:
As you can see, I have quite a lot of things to clear up and I can save close to 70 MB according to WP-Optimize if I ran it right now, which of course I will do. In my experience, this won’t give you a huge boost in site speed like the caching plugin and CDN combo will, but it will push it a bit further towards those sub-one-second page load times.
Blocking Spam Requests
WordPress is an extremely popular platform (exhibit A), which means that each site created with it will be the target of multiple SEO spam tools such as GSA Search Engine Ranker (our tutorial and review), Scrapebox, GScraper, and a dozen others. They won’t only try to post comments multiple times per second, but also try to create accounts on your WordPress site.
The comment spam will be taken care of by Akisment and/or CleanTalk, however, these plugins will only filter out the spam comments. CleanTalk also filters out fake registrations, but as I said, it doesn’t filter the multitude of requests per second, which put a lot of strain on your website. I recently checked the access logs on my server and I was getting like 10 – 20 spam requests per second. The files and URLs most often accessed by the SEO software of spam were:
- /login.php
- /join.php
- /not_found
Especially the first two were being spammed like hell constantly. Now, aside from putting a strain on your hosting, this could also potentially increase your bandwidth – and by a lot. Before I implemented the measure I’m about to share with you, the bandwidth used by my origin server at WPX Hosting was starting to reach 5 – 10 GB per day. This is a ridiculous amount for a website that loads most of its resources from a CDN and reaches a decent cache hit ratio of about 80 – 90 percent.
So I reached out to TPH and they gave me access to the logs. There were a few files aside from the ones mentioned above that were also getting blasted – they contained a few GSA SER footprints – I know right, what the hell was I thinking…
So I deleted those, but I knew that wouldn’t stop the spam and the bandwidth these requests were generating. You see, most of the aforementioned files and URLs cannot be cached by my CDN unless I redirect them to a cacheable page. And each time they try to access one of these pages, they receive this website’s 404 page which is around 500 KB in size. Now that’s a lot of bandwidth and a lot of server resources that shouldn’t be allocated to these spam requests.
So to solve this problem, I had to block access to the most spammed files and URLs. I had already installed a security plugin which had moved the login page to a different location which the spamming software doesn’t know about, so all I had to do was login to my WPX Hosting‘s FTP account and add the following to my .htaccess file:
<Files login.php>
Deny From All
</Files>
This basically serves a “403 Forbidden” page to anyone who tries to access the “login.php” file. And said forbidden page is just 618 bytes in size. I did the same thing for all of the problematic files and URLs, which drastically lowered the bandwidth that my site was generating and also, helped ease the strain put on the TPH server by the multitude of spam requests coming every second. So, if your bandwidth suddenly starts climbing up like crazy, but your website is not generating a substantial amount of real traffic, you now know what to look for and how to fix the problem.
Optimizing WordPress Plugins & Themes
I can’t even believe that people don’t do that by intuition, but I will tell you this: I have looked at a lot of WordPress sites, both clients’ and friends’, and many of them always had a bunch of plugins left there either sitting inactive and doing nothing or being active and not being used at all for anything.
Now that’s not something I wouldn’t exactly call efficient. All of the plugins that are installed on this website are utilized – there isn’t a single one that is active and is not used. And inactive ones get deleted and that’s that. All plugins that remain active on your WordPress installation should be used in one way or another.
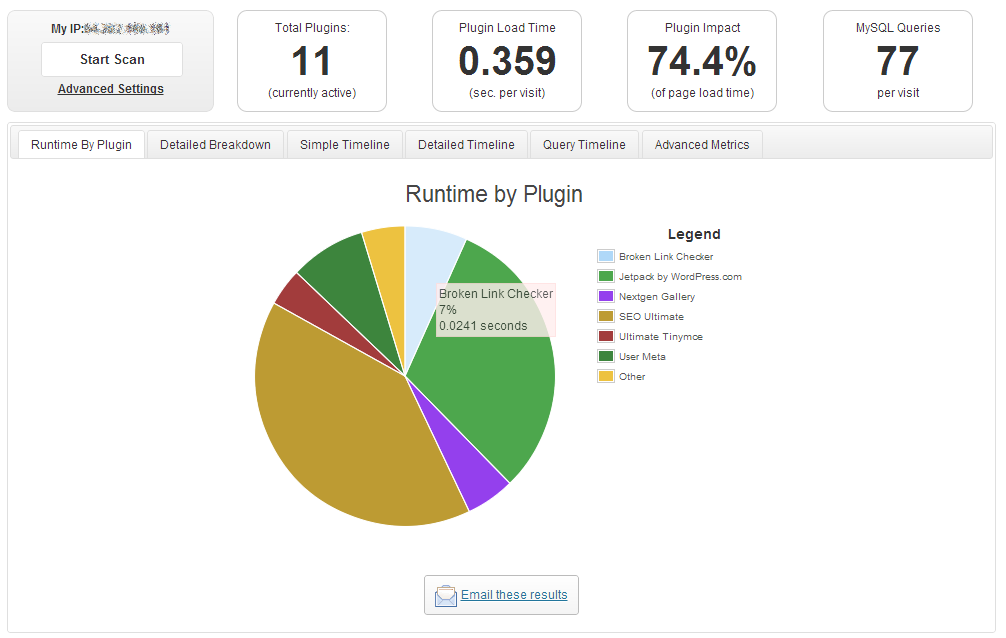
As for the remaining plugins you have, you can check which ones are slowing down your WordPress site the most with the P3 Plugin Performance Profiler plugin. When you install it, you simply click on the “Start Scan” button, then you select “Auto Scan”, and you wait for the results. In the end, the plugin will generate a pie chart similar to the one shown in P3 Plugin Performance Profiler’s description:
As you can see, it simply shows how much of your site’s load time is taken by each plugin you have active. I just want to note again, that these results are not from this website, but from the plugin’s screenshots section – I will share the plugins this website uses in another post that I have planned. Anyway, if you see a plugin that takes too much time to load, and is not vital for your website, you can go ahead and remove it.
For example, little things such as replacing your Twitter plugin with a simple widget, or replacing your Google Analytics plugin with code in the footer, or removing the default “Hello Dolly” plugin, etc, will all give you a little bit of extra site speed.
The plugins that tend to significantly increase page load times are usually social media related ones and the by-default-installed Jetpack plugin. So if possible, go with more simple ones. For this website, we use Social Share & Locker Pro, but it’s not what I would call a light social media plugin, however, it is aesthetic and comes with a lot more functionality than simply adding sharing buttons to your WordPress posts.
As for the WordPress themes, just like with the plugins situation, if you’ve got some that you are not using, simply remove them from your website. And yes, even the ones that come by default with WordPress – Twenty Twelve, Twenty Thirteen, etc – should be removed. Leave just the theme that you are using.
Removing Query Strings From Static Files
Ever gazed upon those version numbers added to the CSS and JavaScript files – like this: “style.css?v=3.6”? Well, those have a purpose and here’s the deal with them. Let’s say that you have installed a WordPress plugin on your website and usually, if it has something to do with user interface, it will come with its own CSS and JavaScript files. Now, these will be cached by MaxCDN upon the first request and will remain there for the expiration time that you have set.
So, when the plugin developer releases an update, it changes that query string (“?v=”) of each of the CSS and JavaScript files, which will force your CDN to store the new files since they have a different name or it will replace the old ones – depends on whether or not you have activated the “Treat as separate cacheable item” option in MaxCDN. Now, that is good of course because that way your CDN will be updated automatically with the latest CSS and JavaScript files, but is also bad and here’s why.
Every time the query string of a static resource changes, your CDN will have to refresh it with the new one leading to more cache misses, which is directly related to slower site speeds and an increased amount of bandwidth on the origin server. And as you probably know, WordPress updates are rolled out constantly not only by plugins, but by themes, and by the core WordPress platform as well. So, these constant changes in query strings of CSS and JavaScript files will cause a lot of cache misses, which, as we already established, is not something you want.
The better option is to remove query string from your static resources and then either let CDN files expire naturally, or purge the cache manually whenever you feel is needed. There is a simple WordPress plugin called Remove Query String From Static Resources that will do as it’s titled – all you have to do is install it and activate it and you are good to go.
Disable The “Force Rewrite Titles” In The Yoast Plugin
Almost every single WordPress site nowadays has Yoast installed. But, most website owners don’t know that Yoast themselves recommend that the “Force Rewrite Titles” setting should be disabled as it could significantly slow down a WordPress site. So, go into your Yoast plugin’s “Titles & Metas” section and disable that checkbox.
WordPress Discussion Settings Optimization
Go to the “Discussion” settings of your WordPress and disable “Allow link notifications from other blogs (pingbacks and trackbacks) on new articles”. This will give you a little bit more site speed – even if it’s just a few milliseconds.
Keep Your WordPress Up-To-Date
Plugins, themes, and WordPress itself should always be up-to-date. However, before you update anything, always check the changelog, so you know what you are getting with the new version. For instance, I have customized a lot of the plugins this site uses and when I update them, I have to re-customize them in the same way unless of course, the update fixes the problem that I had manually fixed beforehand.
Prevent Image Hotlinking
If you don’t know what image hotlinking is basically think of two sites – inetsolutions.org and mortal.com. So we have an article on inetsolutions.org with a few images inserted into it. Each image has its own unique URL right? Well, hotlinking is the act of mortal.com creating an article on their own site and using the images from inetsolutions.org by importing said images’ direct URLs into their own content.
Hotlinking of your website’s images will both put a strain on its hosting and increase its bandwidth. Depending on the site where your image URLs are being used, you can see quite the negative effects. So let’s prevent this from happening. All you need to do is open your .htaccess file and add the following lines:
RewriteEngine on
RewriteCond %{HTTP_REFERER} !^$
RewriteCond %{HTTP_REFERER} !^http(s)?://(www\.)?website.com [NC]
RewriteRule \.(jpg|jpeg|png|gif)$ http://i.imgur.com/XjQA9Q7.jpg [NC,R,L]
And that’s it. Of course, you need to replace “website.com” with your own domain name and you also need to change the “http://i.imgur.com/XjQA9Q7.jpg” URL with an image you want served in place of each image that is “stolen” from your website.
Replace Unnecessary PHP Code With Plain HTML
While there are a number of WordPress themes that are specifically designed for speed, most aren’t. The more popular themes tend to focus on design and functionality (including Enfold) and it’s cool, but that creates a lot of bloat PHP code. Said bloat PHP code is just generic and can be usually replace with plain HTML code which will be executed much faster than PHP and will save your server some processing time as well as a few calls to the database.
Of course, each WordPress theme is different and some might not even have the aforementioned unnecessary PHP code, but let me give you an example of what I mean. The following line is taken directly from the default “header.php” file of Enfold:
if (function_exists(‘avia_favicon’)) { echo avia_favicon(avia_get_option(‘favicon’)); }
Now this line of code basically generates the HTML for the favicon of the website and there’s nothing wrong with it. After all, the Enfold team have to do it that way because they have no idea what the favicon image chosen for the website will be named. The bad news is that each time a page loads, this line of code will make a call to the database (where the indicator whether or not to use a favicon and the path to the image are stored), and will then generate the HTML for the image.
When we have already installed the theme on our site, we no longer need this portability, so we can simply replace this with the end HTML code which you can find by viewing the source code of your website:
<link rel=”icon” href=”https://www.inetsolutions.org/wp-content/uploads/2015/07/favicon.ico” type=”image/x-icon“>
The same thing can be done for core CSS and JavaScript files of the theme. That way, we will save the server some time by allowing it to serve plain HTML which is about 20 times faster than PHP.
Summary Of The Ultimate Guide To WordPress Speed Optimization
And there you have it. Everything I know and have done in order to drastically improve the site speed of this website. I will update this post whenever I find new page load reduction tricks, because there’s always room for improvement, even if it’s just a few milliseconds. Now, we covered quite a few site speed optimization steps and you may have even forgotten some at this point. So let me put them all in one place:
- Choose your WordPress hosting wisely – the server where your site is hosted can make or break it.
- Be mindful of website speed when choosing a WordPress theme – page load times shouldn’t be a deal breaker when it comes to theme selection, however, do not ignore them either.
- Create a Content Delivery Network (CDN) – make sure your website loads fast from every point around the world. MaxCDN and CloudFlare make one of the strongest combinations when it comes to CDN.
- Implement a caching plugin – W3 Total Cache will not only connect your CDN to your WordPress site, but it will also further improve its speed by caching pages and leveraging browser cache.
- Implement a minification plugin – BWP Minify is perfect for the job since it will not only combine and minify CSS and JavaScript files, but it will also allow you to customize their order of loading and the location from which they are loaded.
- Optimize your WordPress images – images can be the ones that cause the most significant increases in both page load times and bandwidth. However, if you pre-optimize them before you upload them to your server, and then if you implement an image lazy loading plugin such as a3 Lazy Load, you won’t have any problems with them.
- Clean up your WordPress database regularly – trashed posts and pages, drafts, post and page revisions, spam comments, etc, can clutter your database and thus slow down your website. Using a plugin such as WP-Optimize on a regular basis will take care that problem.
- Block spam requests – WordPress is a very popular platform and there’s a lot of spam software targeting sites using it. Those spam requests can put a strain on your server and can skyrocket your bandwidth. So, to cope with that, you need to restrict access to files and URLs that are most heavily hit by spammers.
- Optimize your WordPress plugins and theme – inactive plugins and themes should be deleted. Active ones that take way too much time to load should be deactivated and removed if it is possible to replace them with a faster alternative.
- Remove query strings from your static files – save up on some page load times and bandwidth by removing the query strings on files such as stylesheets.
- Uncheck the “Force Rewrite Titles” in the Yoast plugin – if left enabled, it can significantly increase page load times.
- Optimize your WordPress discussion settings – pingbacks and trackbacks should be disabled.
- Remember to update your WordPress site – plugins, theme and the core of WordPress should all be up-to-date.
- Prevent image hotlinking – do not allow any “scrapers” to use your content.
- Use plain HTML instead of PHP code wherever possible – save up on some database requests and server load by replacing bloat PHP code with plain HTML code.
Wrapping It All Up
That was one hell of a speedy ride. I have included absolutely everything I know and have done in terms of optimizing the speed of this WordPress website and I think it covered every aspect of the process. Now you won’t have to open 20 tabs with website speed optimization posts and then go through each one of them in search of something that you haven’t already implemented – you can use this ultimate tutorial that has everything in one place.
Keep in mind that a part of WordPress speed optimization is an ongoing process, so you must never discontinue it otherwise your website will slow down eventually. Optimization of the database, optimization of the plugins and your theme, keeping WordPress up-to-date, image optimization, and stuff like that must be done on a regular basis.
Now, there is always a chance that I might have missed something speed optimization-wise, but I doubt it. However, who knows what new speed hacks tomorrow will bring right? So for all of us optimization freaks, this never-ending speed improvement process is just perfect.
Bottom line is, I’d love to hear about some WordPress speed optimization tricks that I might have missed out on or gotten wrong. Maybe I configured something wrong? Maybe I made a mistake with some of the settings of some of the plugins used? Let me know and I will look into it and update this post as soon as possible. I can’t wait to make this website even faster than it already is.

